Ironman Software Forums
Continue the conversion on the Ironman Software forums. Chat with over 1000 users about PowerShell, PowerShell Universal, and PowerShell Pro Tools.
 Discuss this Article
Windows Forms has been a part of .NET Development since 2002. The technology is available on all modern Windows operating systems, has recently been open-sourced and makes for easy tool development in PowerShell. That said, with the advent of cloud computing and browser technology, having tools available remotely is becoming more important.
In this post, we’ll look at converting a popular tool found on PoshGUI.com to a web app using PowerShell Universal. PowerShell Universal is the ultimate platform for building web-based IT tools.
There are some differences that we need to be aware of when running a web application versus running a Windows Forms app.
The first difference is the context of where the application is running. Windows Forms applications run under the context of the user executing the the PS1 file to create the form. That means they have access to all the features of the operating system. The Windows Forms application will be able to start other processes as the user. The user will also have to have the permissions necessary to perform the actions that are taken by the application.
Web applications, like the one we will be building with PowerShell Universal, run on a server and allow multiple people to access the same application from a web browser. The users will not be able to launch processes on their own machine. The process will be running under a service account on the server. It’s possible to elevate users to another context if credentials are present; like with Universal Automation.
There are differences in the components available. As you can see with this screen shot of PSScriptPad, there are a lot of components available with Windows Forms.

HTML web pages have a standard set of input controls but with JavaScript and CSS, you can create pretty much any control you can imagine. PowerShell Universal has a large set of built in controls but will not cover every single component in Windows Forms.
That said, PowerShell Universal, is extensible so any component you dream up could be created with the JavaScript library that is available. You can even browse the Universal Dashboard Marketplace to find controls that others have created.
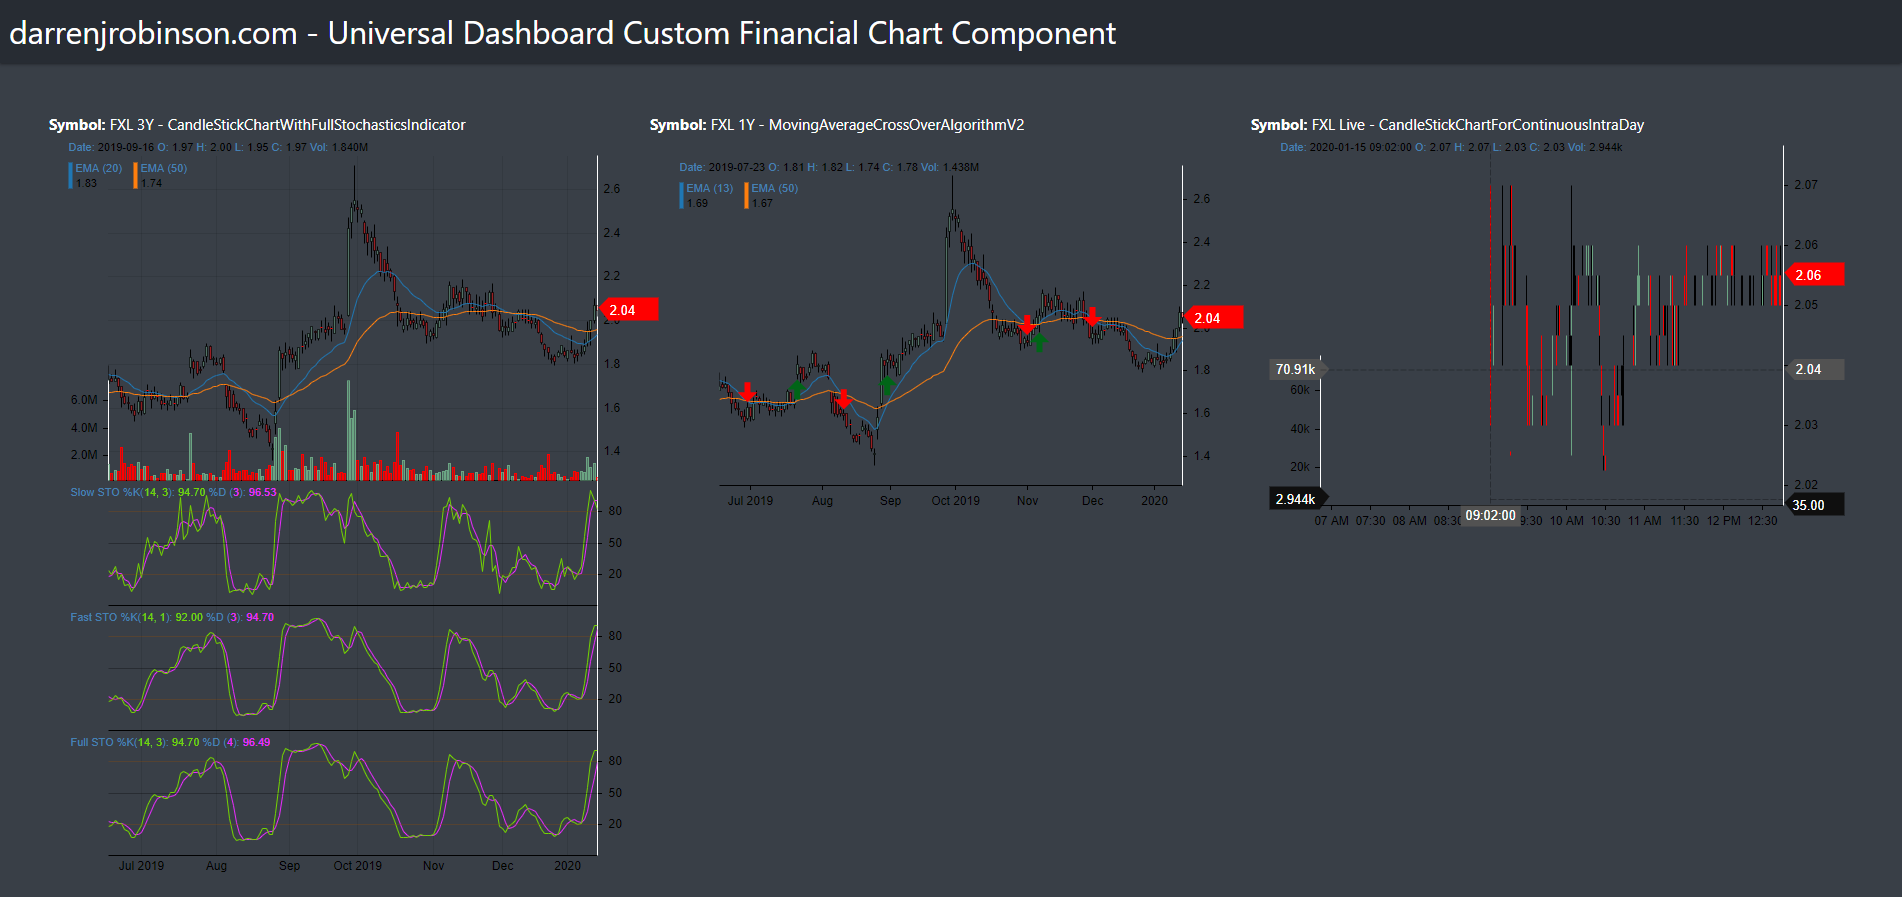
Here’s an example of a custom financial chart component.
Windows Forms is typically used with a static layout. The controls are arranged and sized based on static numbers. This means that when you resize the form or use it on a screen with a different resolution, you can run into problems where the form is too small or the controls don’t take up the whole screen.
Web applications are typically adaptive and will accommodate multiple screen sizes are they may be accessed on a phone, tablet or computer.
Universal Dashboard uses an adaptive layout system by default.
One of the benefits and downfalls of Windows Forms applications built in PowerShell is that you can simply provide a PS1 file or an executable created by a tool like PowerShell Pro Tools. It makes it easy to distribute but it can be hard to update because it’s harder to track which version of the script someone may have.
With a web application, you have a central server that runs the tool and it can be updated in one place. You will also be able to better control access to the tool based on authentication and authorization. PowerShell Universal has many ways that you can host your tool.
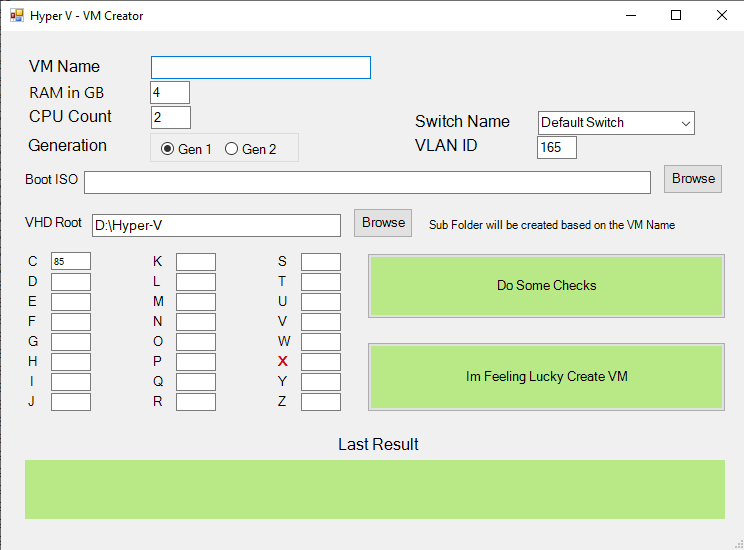
We will be using the Hyper-V VM Creator tool as an example. First, we’ll look at how to decide which components to use. Next, we’ll layout the tool using the Universal Dashboard grid layout. Finally, we will hook up the logic within the dashboard.
This tool allows the user to enter information about a Hyper-V VM, validate that configuration and then create that virtual machine.
The first step is to create a new dashboard in PowerShell Universal. You can think of a dashboard like a Windows Form.
Here is the form code.
$HyperVVMCreator                 = New-Object system.Windows.Forms.Form
$HyperVVMCreator.ClientSize      = New-Object System.Drawing.Point(744,519)
$HyperVVMCreator.text            = "Hyper V - VM Creator"
$HyperVVMCreator.TopMost         = $false
To create a dashboard, you would do this. There’s no need to set the size as the dashboard will take up the whole browser screen.
New-UDDashboard -Title 'Hyper V - VM - Creator" -Content {

}
The New-UDTypography cmdlet can be used in place of a label. Many of the Universal Dashboard controls have built in labels or placeholders so converting labels may not be necessary for all controls.
Windows Forms script
$VMNameLabel                     = New-Object system.Windows.Forms.Label
$VMNameLabel.text                = "VM Name"
$VMNameLabel.AutoSize            = $false
$VMNameLabel.width               = 115
$VMNameLabel.height              = 20
$VMNameLabel.location            = New-Object System.Drawing.Point(25,25)
$VMNameLabel.Font                = New-Object System.Drawing.Font('Microsoft Sans Serif',12)
$VMNameLabel.ForeColor           = [System.Drawing.ColorTranslator]::FromHtml("")
Universal Dashboard script
New-UDTypography -Text 'VM Name'
Some of the labels are bold or different sizes. You can use the variant of New-UDTypography to adjust the font size.
New-UDTypography -Text 'X' -Variant h3
Text boxes can be converted to New-UDTextbox calls. You will need to set the ID of the textbox in Universal Dashboard.
Windows Forms script
$VMNameTextBox                   = New-Object system.Windows.Forms.TextBox
$VMNameTextBox.multiline         = $false
$VMNameTextBox.width             = 220
$VMNameTextBox.height            = 10
$VMNameTextBox.location          = New-Object System.Drawing.Point(150,25)
$VMNameTextBox.Font              = New-Object System.Drawing.Font('Microsoft Sans Serif',10)
Universal Dashboard script
New-UDTextbox -Id 'VMNameTextBox' -Label 'VM Name'
Radio buttons can be converted to New-UDRadioGroup and New-UDRadio in Universal Dashboard.
Windows Forms script
$Gen1RadioButton                 = New-Object system.Windows.Forms.RadioButton
$Gen1RadioButton.text            = "Gen 1"
$Gen1RadioButton.AutoSize        = $false
$Gen1RadioButton.width           = 60
$Gen1RadioButton.height          = 20
$Gen1RadioButton.location        = New-Object System.Drawing.Point(11,12)
$Gen1RadioButton.Font            = New-Object System.Drawing.Font('Microsoft Sans Serif',10)
Universal Dashboard script
New-UDRadioGroup -Id 'VMGeneration' -Children {
    New-UDRadio -Label 'Gen1' -Value 'Gen1'
    New-UDRadio -Label 'Gen2' -Value 'Gen2'
}
Buttons can be converted to New-UDButton calls. We will look at how to define the functionality of the button later on.
Windows Forms script
$BootISOBrowseButton             = New-Object system.Windows.Forms.Button
$BootISOBrowseButton.text        = "Browse"
$BootISOBrowseButton.width       = 60
$BootISOBrowseButton.height      = 30
$BootISOBrowseButton.location    = New-Object System.Drawing.Point(662,133)
$BootISOBrowseButton.Font        = New-Object System.Drawing.Font('Microsoft Sans Serif',10)
Universal Dashboard script
New-UDButton -Text 'Browse'
Combo boxes can be converted to New-UDSelect calls. We will look at how to populate the contents of the select in the logic section.
Windows Forms script
$SwitchNameComboBox              = New-Object system.Windows.Forms.ComboBox
$SwitchNameComboBox.text         = "Switch Name"
$SwitchNameComboBox.width        = 157
$SwitchNameComboBox.height       = 20
$SwitchNameComboBox.location     = New-Object System.Drawing.Point(537,80)
$SwitchNameComboBox.Font         = New-Object System.Drawing.Font('Microsoft Sans Serif',10)
Universal Dashboard script
New-UDSelect -Label 'Switch Name'
Now that we have converted each of our Windows Forms control into a Universal Dashboard component call, we can layout the controls in a way that makes sense. We will configure the grid so that it works well on both large and small screens.
Universal Dashboard employs a 12-column grid system. Each column takes up 1/12th of the screen. You can define the size of columns based on the screen size of the user’s device. You can learn more about the grid system here.
First, let’s layout the controls. You can use the New-UDRow and New-UDColumn cmdlets to define the rows and columns for your grid. The full layout will be linked to this article and available on GitHub.
The first row contains a single column that extends the width of the screen to define the VM Name.
New-UDRow -Columns {
    New-UDColumn -LargeSize 12 -Content {
        New-UDTextbox -Id 'VMName' -Placeholder 'VM Name'
    }
}
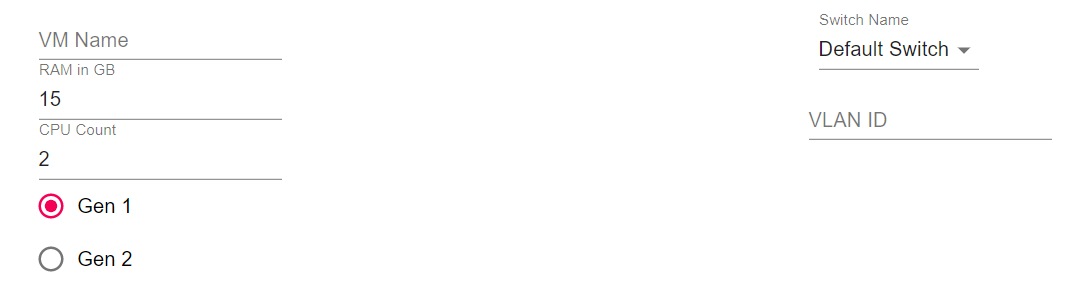
The second row consists of five controls for defining the RAM, CPU count, switch name, generation and VLAN ID. It contains two columns that take up 50% of the screen.

New-UDRow -Columns {
    New-UDColumn -LargeSize 6 -Content {
        New-UDTextbox -Id 'VMRam' -Placeholder 'RAM in GB' -Value 4
        New-UDTextbox -Id 'VMCPU' -Placeholder 'CPU Count' -Value 2
        New-UDRadioGroup -Id 'VMGeneration' -Children {
            New-UDRadio -Label 'Gen1' -Value 'Gen1'
            New-UDRadio -Label 'Gen2' -Value 'Gen2'
        }
    }
    New-UDColumn -LargeSize 6 -Content {
        New-UDSelect -Label 'Switch Name'
        New-UDTextbox -Id 'VMVLAN' -Placeholder 'VLAN ID'
    }
}
Here is what the Universal Dashboard form will look like.
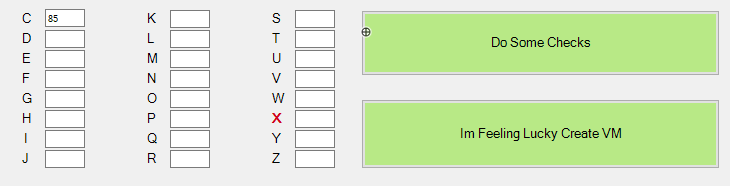
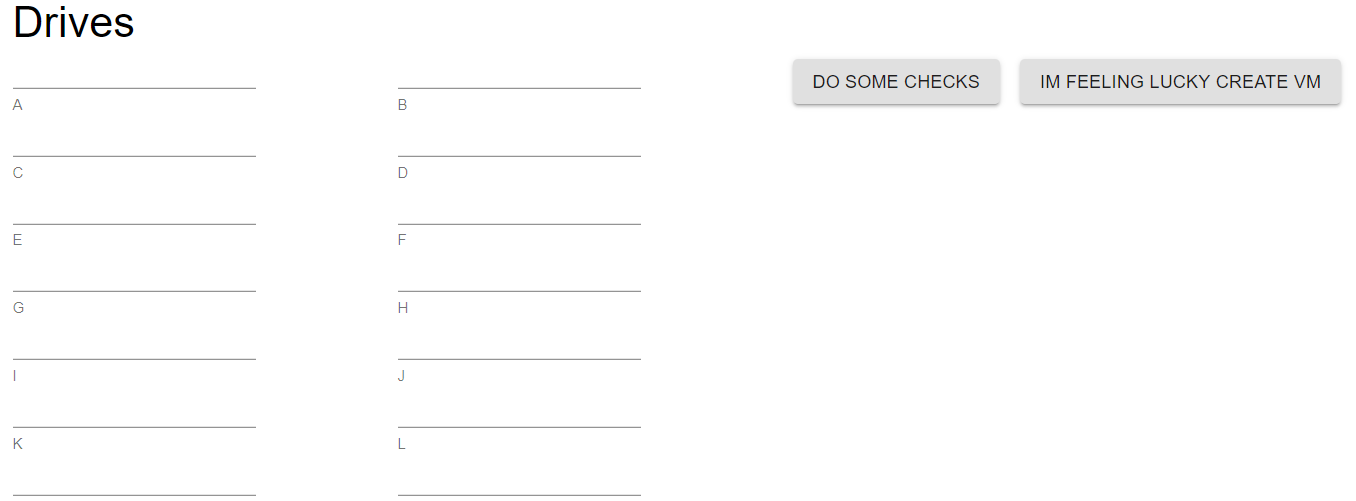
You can also nest rows and columns. To define the drive size textboxes and validation and creation buttons, we can use this technique.
Here is the Universal Dashboard script to create this layout.
New-UDRow -Columns -Content {
    New-UDColumn -LargeSize 6 -Content {
        New-UDRow -Columns {
            # Loop through each letter of the alphabet
            (65..90) | ForEach-Object {
                New-UDColumn -LargeSize 6 -Content {
                    $DriveLetter = [char]$_
                    New-UDTextbox -Id "Drive$DriveLetter" -Placeholder $DriverLetter
                }
            }
        }
    }
    New-UDColumn -LargeSize 6 -Content {
        New-UDButton -Text 'Do Some Checks'
        New-UDButton -Text 'Im feeling lucky Create Vm'
    }
}
Here is what the Universal Dashboard form will look like.
Now that we have looked at how to create the layout, let’s finish it up by implementing the logic.
Dashboard scripts run within PowerShell that is hosted by Universal and you can call any cmdlets during startup to load data for your UI. You need to make sure to avoid returning data to the pipeline outside of the New-UDDashboard content.
This, for example, will cause a dashboard to not start correctly.
Get-Process

New-UDDashboard -Title 'Processes' -Content {}
In terms of our Hyper-V VM Creator, we can load the host’s RAM during start up and store it in a variable. This variable will be available throughout all your scripts.
$HostRam = Get-WMIObject -class Win32_PhysicalMemory | Measure-Object -Property capacity -Sum | % {[Math]::Round(($_.sum / 1GB *0.97),0)-1}

New-UDDashboard -Title 'Hyper-V VM Creator' -Content {

}
Here’s an example of using the switch list to define the options for our Virtual Switch select.
$SwitchList = Get-VMSwitch | Select name

New-UDDashboard -Title 'Hyper-V VM Creator' -Content {
    New-UDSelect -Label 'Virtual Switch' -Options {
        $SwitchList | Foreach-Object {
            New-UDSelectOption -Name $_ -Value $_
        }

    }
}
To implement button clicks, you can define the -OnClick parameter of New-UDButton. Let’s take a look at converting some of the logic for the Run Checks button to Universal Dashboard.
Here is a snippet of some of the Run-Checks function. There are a couple different ways we need to adjust this.
function Run-Checks
{
    $VMHostInfo=Get-VMHost

    #Paths and Gen Sets
    if ($BootISOTextBox.Text -ne "") {$ISOFilePathValid = test-path $BootISOTextBox.Text}
    if ($VHDRootTextBox.Text -ne "") {$VHDBootPathValid = test-path $VHDRootTextBox.Text}
    if ($Gen1RadioButton.Checked -eq $True) {$VMGeneration = 1}
    if ($Gen2RadioButton.Checked -eq $True) {$VMGeneration = 2}
    if ($VMNameTextBox.TextLength -ne 0) {$VMExists = Get-VM -name $VMNameTextBox.Text -ErrorAction SilentlyContinue}

    if (-not(Test-IsAdmin)) {$LastResultLabel.text = "Please Rerun this Powershell Script with Admin Rights"}
    elseif (-not (Test-Path $VMHostInfo.VirtualMachinePath) ) {$LastResultLabel.text = "Default Virtual Machine path is not valid in HyperV Host Settings"}
    elseif (-not (Test-Path $VMHostInfo.VirtualHardDiskPath) ) {$LastResultLabel.text = "Default Virtual Harddisk path is not valid in HyperV Host Settings"}
    elseif ($VMExists) {$LastResultLabel.text = "VM with that name already exists"}
    # more stuff
}
Retrieving Input Values
First, we need to retrieve input values using Get-UDElement. We retrieve information about the component and then look at the value property. We can use the same logic to validate the value with Test-Path
$BootISOTextboxText = (Get-UDElement -Id 'BootISOTextBox')["value"]
if ($BootISOTextBoxText -ne "") {$ISOFilePathValid = test-path $BootISOTextBoxText}
Showing Results
Rather than using a label to show results, we will take advantage of the Show-UDToast cmdlet to popup a toast notification if something isn’t right.
if (-not(Test-IsAdmin)) {Show-UDToast -Message "Please Rerun this Powershell Script with Admin Rights"}
Now that we’ve gone through and converted our controls, setup our layout and adjusted our logic, you can start up the dashboard and create VMs from your web browser.
The entire source code for this conversion is available on GitHub. You can download PowerShell Universal from our Downloads page.
Continue the conversion on the Ironman Software forums. Chat with over 1000 users about PowerShell, PowerShell Universal, and PowerShell Pro Tools.