Ironman Software Forums
Continue the conversion on the Ironman Software forums. Chat with over 1000 users about PowerShell, PowerShell Universal, and PowerShell Pro Tools.

 Discuss this Article
In this post, we’ll look at how to use TinyMCE with a stepper component in Universal Dashboard.
New-UDTinyMCETinyMCE is an extremely powerful text editor component that has been packaged as a Universal Dashboard component with the New-UDTinyMCE function.
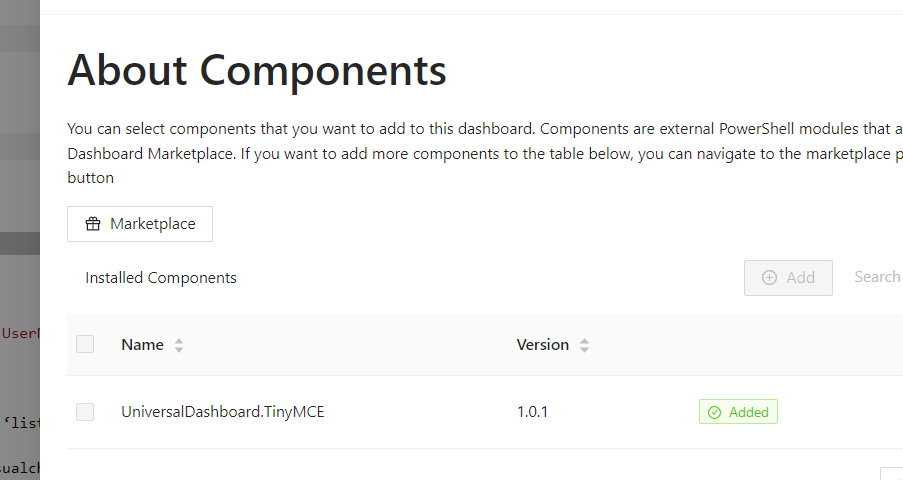
You can install the UniversalDashboard.TinyMCE module from the PowerShell Gallery or within the PowerShell Universal admin console to enable this functionality.

Make sure to add the component do your dashboard.
Once you have the component added to your dashboard, you can then create a new instance of it within your dashboard’s page. This example enables a wide range of features and toolbar options.
  $TinyMCEOptions = @{
    plugins = ‘advlist’, ‘autolink’, ‘link’, ‘image’, ‘lists’, ‘charmap’, ‘preview’, ‘anchor’, ‘pagebreak’,
    ‘searchreplace’, ‘wordcount’, ‘visualblocks’, ‘visualchars’, ‘code’, ‘fullscreen’, ‘insertdatetime’,
    ‘media’, ‘table’, ‘emoticons’, ‘template’, ‘help’
    toolbar = ‘undo redo | styles | bold italic | alignleft aligncenter alignright alignjustify |
    bullist numlist outdent indent | link | preview fullscreen |
    forecolor backcolor emoticons | code | help’
    menubar = ‘favs file edit view insert format tools table help’
    icons = ‘material’
}
New-UDTinyMCE -Init $TinyMCEOptions
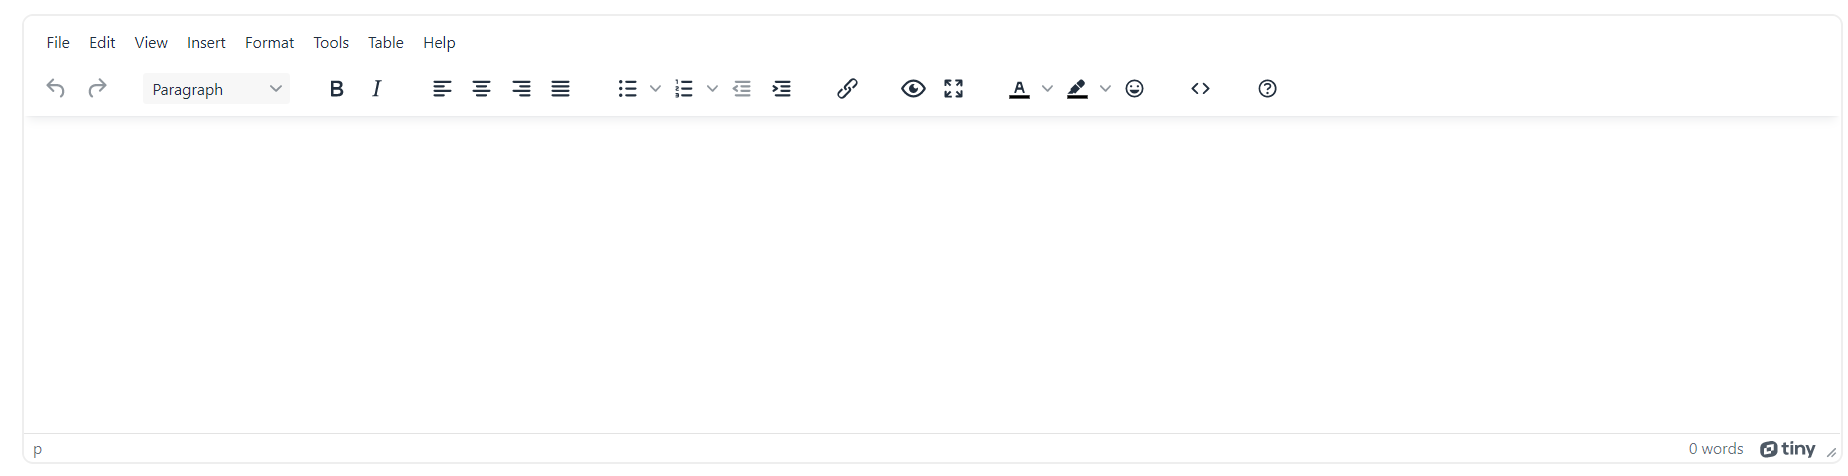
The result is a TinyMCE instance in your dashboard.
In order to integrate it with the stepper, you’ll need to create a hidden input control since TinyMCE doesn’t directly integrate with UD forms or steppers.
First, you will need to create a stepper control that has a few steps. In this example, we use a user info step and a profile step.
New-UDStepper -Children {
    New-UDStep -Label "User Info" -OnLoad {
        New-UDTextbox -Label "Name" -Id 'Name'
        New-UDTextbox -Label "User Name" -Id 'UserName'
    }
    New-UDStep -Label "Profile" -OnLoad {
    }
}
Next, add the TinyMCE editor to the profile step.
New-UDStep -Label "Profile" -OnLoad {
    $TinyMCEOptions = @{
      plugins = ‘advlist’, ‘autolink’, ‘link’, ‘image’, ‘lists’, ‘charmap’, ‘preview’, ‘anchor’, ‘pagebreak’,
      ‘searchreplace’, ‘wordcount’, ‘visualblocks’, ‘visualchars’, ‘code’, ‘fullscreen’, ‘insertdatetime’,
      ‘media’, ‘table’, ‘emoticons’, ‘template’, ‘help’
      toolbar = ‘undo redo | styles | bold italic | alignleft aligncenter alignright alignjustify |
      bullist numlist outdent indent | link | preview fullscreen |
      forecolor backcolor emoticons | code | help’
      menubar = ‘favs file edit view insert format tools table help’
      icons = ‘material’
    }
    New-UDTinyMCE -Init $TinyMCEOptions
}
To integrate the TinyMCE editor into the stepper, you will need to create a hidden textbox and update the value when the editor changes. In the below code, the -OnEditorChange event handler is used to update the value of the profile textbox using Set-UDElement.
New-UDTinyMCE -Init $TinyMCEOptions -OnEditorChange {
    Set-UDElement -Id 'profile' -Properties @{
        value = $Body
    }
}
New-UDElement -Tag 'div' -Content {
  New-UDTextbox -Id 'profile'
} -Attributes @{
  style = @{
      display = 'none'
  }
}
Finally, you can tie it all together by implementing an -OnFinish event handler for New-UDStepper. You can find the full code example below.
New-UDStepper -Children {
    New-UDStep -Label "User Info" -OnLoad {
        New-UDTextbox -Label "Name" -Id 'Name'
        New-UDTextbox -Label "User Name" -Id 'UserName'
    }
    New-UDStep -Label "Profile" -OnLoad {
        $TinyMCEOptions = @{
          plugins = ‘advlist’, ‘autolink’, ‘link’, ‘image’, ‘lists’, ‘charmap’, ‘preview’, ‘anchor’, ‘pagebreak’,
          ‘searchreplace’, ‘wordcount’, ‘visualblocks’, ‘visualchars’, ‘code’, ‘fullscreen’, ‘insertdatetime’,
          ‘media’, ‘table’, ‘emoticons’, ‘template’, ‘help’
          toolbar = ‘undo redo | styles | bold italic | alignleft aligncenter alignright alignjustify |
          bullist numlist outdent indent | link | preview fullscreen |
          forecolor backcolor emoticons | code | help’
          menubar = ‘favs file edit view insert format tools table help’
          icons = ‘material’
        }
        New-UDTinyMCE -Init $TinyMCEOptions -OnEditorChange {
            Set-UDElement -Id 'profile' -Properties @{
                value = $Body
            }
        }
        New-UDElement -Tag 'div' -Content {
          New-UDTextbox -Id 'profile'
        } -Attributes @{
          style = @{
              display = 'none'
          }
        }
  }
} -OnFinish {
    Show-UDToast $Body
}
Find this useful? Please consider sharing this article. Have a question about PowerShell? Contact us and we'll write a post about it.
Continue the conversion on the Ironman Software forums. Chat with over 1000 users about PowerShell, PowerShell Universal, and PowerShell Pro Tools.